


在看到Dan的overreact.io时,我的眼睛瞬间被吸引,优雅真是太优雅了,所以我迫不及待想搭建一个类似的博客网站。
搭建需要的工具链 Gatsby
开始搭建
本博客是直接在blog模版gatsby-starter-blog 的基础上搭建而成的。
首先我们使用命令来创建,自定义你的项目名
npx gatsby new 你的项目名 https://github.com/gatsbyjs/gatsby-starter-blog创建完成后 cd到你的项目文件夹,运行 yarn develop 即可在浏览器 http://localhost:8000/ 显示项目模版内容
修改目录结构
首先我们在 style.css 将主题自定义成我们自己的样式
- 为了方便和美观将默认的content/blog文件放进src中,更改
gatsby-config-js中gatsby-source-filesystem的path指向为src。
使用ts
引入typescript 并且创建tsconfig.json
yarn add -D typescript && npx tsc --init具体配置详见: tsconfig.json
配置Eslint和prettier
Eslint规范typescript和react
- 安装依赖
yarn add eslint @typescript-eslint/parser @typescript-eslint/eslint-plugin eslint-plugin-react eslint-plugin-react-hooks eslint-plugin-importeslint: eslint核心代码 @typescript-eslint/parser: esLint 的解析器,解析 TypeScript,检查和规范 TypeScript 代码; @typescript-eslint/eslint-plugin: esLint 插件,包含了定义好的检测 TypeScript 代码的规范。 eslint-plugin-react: 校验 React eslint-plugin-react-hooks: 根据 Hooks API 校验 Hooks 的使用 eslint-plugin-import: 此插件主要为了校验 import/export 语法,防止错误拼写文件路径以及导出名称的问题 进行排序
根目录下新建.eslintrc.js,具体配置如.eslintrc.js,
- 配置prettier
在.vscode/settings.json中新增一个属性,保存自动格式化
{
  "editor.formatOnSave": true
}
安装依赖
yarn add prettier eslint-config-prettier eslint-plugin-prettierprettier: 格式化规则程序 eslint-config-prettier: 禁用所有和 Prettier 产生冲突的规则 eslint-plugin-prettier: 把 Prettier 应用到 Eslint,配合 rules "prettier/prettier": "error" 实现 Eslint 提醒。
根目录下新建.prettierrc和.prettierignore,具体配置如.prettierrc、.prettierignore
配置husky和lint-staged构建提交校验
安装依赖
yarn add -D husky lint-staged配置husky的pre-commit钩子
npx husky install会在根目录生成.husky文件,生成文件后,我们需要在husky的钩子监听pre-commit后,执行我们自定义的语法检查
npx husky add .husky/pre-commit 'yarn check-type && yarn lint-staged'在package.json文件中添加如下脚本
"scripts": {
    "lint": "eslint --ext js,jsx,ts,tsx .",
    "check-type": "tsc --noEmit"
  },
  "lint-staged": {
    "*.{js,jsx,ts,tsx}": [
      "eslint --fix"
    ]
  }
配置tailwindcss
将tailwind作为PostCss插件安装是将其与构建工具集成的最无缝方式 具体的配置路径:Get started with Tailwind CSS
- 安装tailwindcss并且创建
tailwind.config.js
npm install -D tailwindcss postcss autoprefixer
npx tailwindcss init- 添加
tailwindcss和autoprefixer到postcss.config.css
module.exports = {
  plugins: {
    tailwindcss: {},
    autoprefixer: {},
  }
}- 配置模版路径
module.exports = {
  content: [
    './src/pages/**/*.{js,jsx,ts,tsx}',
    './src/components/**/*.{js,jsx,ts,tsx}',
  ],
  theme: {
    extend: {},
  },
  plugins: [],
}
- 将tailwind指令添加到全局css中
@tailwind base;
@tailwind components;
@tailwind utilities;- yarn dev后就可以正常使用tailwindcss了
将本地搭建好的项目推送至github
- 检查是否生成密钥
ls有两个文件,id_rsa.pub就是公钥
cd ~/.ssh
ls
如果没有生成,则通过命令回车生成ssh key
$ ssh-keygen -t rsa -C "github登录邮箱email@example.com"github添加ssh:settings -> SSH and GPG KEYS, 点击New SSH key, 把id_rsa.pub的内容复制到key中
- 然后在github上创建一个new github仓库
- 在本地项目中创建一个git仓库
git init提交本地代码至git
git add .
git commit -m "XXX"
将main改至master
git branch -M master将本地仓库关联到github上
git remote add origin 你的github仓库地址将本地仓库所有内容推送至远程库
git push -u origin master创建黑暗模式
这里详见另一篇博文:The pursuit of perfect dark patterns
本地仓库推到github仓库 create a new repository on the command line
git init
git add README.md
git commit -m "first commit"
git branch -M master
git remote add origin github仓库ssh/https地址
git push -u origin master
or push an existing repository from the command line
git remote add origin github仓库ssh/https地址
git branch -M master
git push -u origin master
srr serve与client 页面路径不匹配时(没有正确水合 hydrate ),这导致 gatsby develop 和 gatsby build 不一致。排查是否使用了window及其的方法,如果有,我们需要将获取放在useEffect中,保证代码不会执行,除非在浏览器中。详见:Debugging HTML Builds
使用Github Actions自动化部署
Github Actions是github提供的免费的自动化构建部署,用于构建、测试和部署应用代码的平台
在仓库中设置Github Actions
点击仓库中的Actions选项卡,点击set up workflow yourself,如图所示
 会自动在根目录下创建一个
.github/workflows/main.yml文件,我们可以修改文件名为overpurple.yml
 在Github Actions市场有很多预制的action,这里我们选择的是里的Gatsby Publish Node16
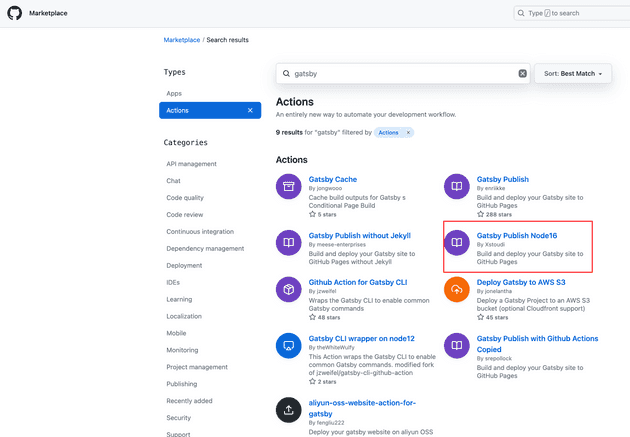 点击Gatsby Publish Node16进去,我们将里面的使用代码粘贴进项目的
overpurple.yml文件中保存。修改为下面code
name: Overpurple Gatsby Publish

on:
  push:
    branches:
      - master

jobs:
  build:

    runs-on: ubuntu-latest

    steps:
    - uses: actions/checkout@v3
    - name: Gatsby Publish Node16
      uses: Xstoudi/gatsby-gh-pages-action@v3.0.0
    # - uses: enriikke/gatsby-gh-pages-action@v2
      with:
        access-token: ${{ secrets.OVERPURPLE }}
        deploy-branch: gh-pages
        gatsby-args: --prefix-paths
这样就设置了工作流,它将根据yaml文件中定义的触发器运行。然后我push到仓库中,在每次代码提交master后就会触发actions
这里我们可以遵循一些简单技巧,选择创建适合我们自己的actions
- 了解问题,在开始构建前,我们确保要解决的问题以及如何解决。
- 选择正确的技术栈:如使用javascript或 Docker 编写github actions。
- 利用已有的软件包,如 @actions/core 和 @actions/github,它们提供了与 GitHub Actions 环境和 GitHub API 的简单互动。
- 在成功创建自己的工作流程后,你有可能想要发布它。无论你是否发布,请确保测试你的 action 是否有潜在的问题或错误。
关于创建自定义action:可参考官方文档提供的详细信息
- github actions组件介绍
github actions主要由三个主要组件组成:工作流(Workflows)、事件(Events)、任务(Jobs)
- Workflows:定义自动化过程的规则集,它们在 YAML 文件中定义,该文件存储在 .github/workflows 目录中
- Events: 启动工作流。例如,你可以将事件设置为在创建PR或新开issie是运行工作流。要在工作流中定义时间,使用关键字on后跟事件名称
on:
    issues:
        types: [opened]
    pull_request_target:
types: [opened]- Jobs: 构成工作流程。默认情况下,任务是同时运行的。要在给定的工作流中定义你的任务,使用关键字jobs,后跟每个人物及其配置的唯一标识符
jobs:
  build:
    runs-on: ubuntu-latest
    steps:
      - name: Check out repository
        uses: actions/checkout@v2
      - name: Set up Python
        uses: actions/setup-python@v2
        with:
          python-version: 3.10
      - name: Install dependencies
        run: |
pip install -r requirements.txt如何实现代码QA的自动化,参考文章:如何使用 GitHub Actions 实现开源项目的自动化